You can replay the game in its entirety or walk through the game along with the analysis here.
1.e4 c5 2.Nc3 e6 3.f4 d5
In the closed Sicilian, I have never come out satisfactorily out of the opening. Not wanting to open up the position before I’ve castled, I would normally play d6, Nf6, Be7, resulting in a passive position and my attempts at queenside play were almost always too slow. So I tried to play actively in the center hoping to avoid similar issues.
4.e5 d4 5.Ne4 Nh6
I was already in an unfamiliar position in the opening. Having decided to allow d5 early on and needing to prevent Nd6, this was the only square left for my knight. On the plus side, though the knight’s developed on the rim, it prevents g4 and f5, two key pawn pushes for white in the closed Sicilian. And with most of the play happening on the kingside, it turns out to be a useful square for the knight.
6.Nf3 Be7 7.Bc4
I don’t play the white side of the closed Sicilian, so I am not an authority on it. But the plan with g3 and Bg2 seems more potent to me.
7…O-O 8.O-O b6 9.d3 Bb7 10.Neg5!?
I don’t know if he saw my little trap here or intended to make this move all along. The trap being, if he made some other move here, say Qe2, I had the subtle 10…b5!, winning a piece.
10…Nc6 11.Bxe6??
I think this is a big mistake. Strictly on material count, he might be better, winning a rook and two pawns for a knight and bishop. But he no longer has an attack against my king, while I can start building pressure on his kingside. Additionally, his light squared weaknesses are even more brutally exposed with the loss of his bishop as its counterpart sits pretty on the long diagonal.
11…fxe6 12.Nxe6 Qd7 13.Nxf8 Rxf8 14.Qe2 Nd8 15.Bd2 Ne6 16.Ng5 Qc6 17.Nxe6 Qxe6 18.h3?!
Weakening even more squares around his kingside, though its hard to suggest more useful moves. Maybe his plan was to follow up with g4, preparing f5, but this also opens up his king to enemy attacks. A better plan might have been to play on the queenside, attacking black’s pawn structure.
18…Nf5 19.Kh2 Bh4 20.Qg4 Bg3+ 21.Kg1 Qd5 22.Rf3 Bh4 23.b3?!-+
Once again, a strange move. On his queenside, white needs to challenge the pawns on the dark squares, not give up total control. Anyway, this doesn’t hurt him because of black’s next few moves, where he throws away his big advantage and ends up losing.
23…Ne3??
I had been eyeing the e3 square for my knight for quite a while. With my direct attack not coming to fruition, I felt I should return two minor pieces for his rook and then use the passed e-pawn (after Bxe3 dxe3) to press for victory. But it was much better to keep the pieces on the board and build a much stronger attack with 23…Qf7 24.Rff1 h5 25.Qe2 [25.Qd1 Qg6 Qe2] Ng3 26.Qf2 Nxf1 27.Qxf1 Bg3, at the end of which I am totally winning, up a full piece and about to win the f4 pawn to boot.
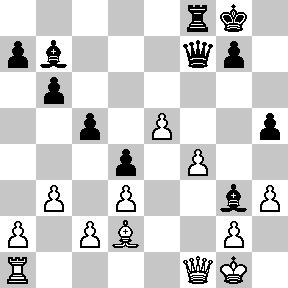
[Analysis diagram after 27…Bg3]
24.Bxe3 dxe3 25.Qxh4 Qd4 26.Qe1 Bxf3 27.gxf3 e2+?
Qxf4 was much stronger.
28.Kg2 Rxf4?
Once again Qxf4 was much stronger, putting pressure on the f3 pawn. After this mistake, I have a thankless task while white can play on without fear.
29.e6 Qe3 30.Qf2 Qxe6 31.Re1 Rf6 32.Qxe2 Rg6+ 33.Kf2 Qxe2+ 34.Rxe2 Kf7 35.f4 Rh6 36.Kg3 Rg6+ 37.Kf3 Rh6 38.Rh2 Ke6 39.Ke4 Kd6 40.h4 Re6+ 41.Kf3 Kd5 42.c3 Re1 43.Re2 Rf1+ 44.Kg4 Rg1+ 45.Kf5 Rh1 46.Re7 Rxh4 47.Rd7+ Kc6 48.Rxg7 Rh3 49.Rxa7 Rxd3 50.Rxh7 Rxc3 51.Kf6 c4 52.Rh8 Kc7?
Kb7 was needed, preventing white’s rook from arriving at a8 and protecting the a2 pawn. b5 was also possible.
53.bxc4 Rxc4 54.f5 Rc2 55.Ra8 Kb7 56.Ra3 b5 57.Kf7 Rc7+?
A wasted rook maneuver. Better would have been 57…b4, forcing the trade of the queenside pawns. Of course, I was lost long before this, so this only hastens the end.
58.Kg6 Kc8?
The last big mistake. For the second time in the game, I allow the white rook to come to the a8 square!
59.f6 Rc2 60.f7 Rg2+ 61.Kh5 Rf2 62.Ra8+ 1-0


